
How To Format For ebook
Now, in a former life, I was an accredited trainer of all things Microsoft® and the biggest revelation to me was how poorly prepared people were when given a PC and expected to “get on with it”. We wouldn’t let a welder just weld, but we let an administrator just wield their way through Word. Normally woefully.
Thankfully, it needn’t be that way. To format a document is a simple matter of using things that expert programmers have built into Word for us. Sadly, so few even know these things exist, let alone how to use them.
So, if you want to format a Word document such that it sails through the conversion process for Kindle’s Mobi or the more generic E-Pub… read on.
![]() First things first, you need to lose quite a lot of what would be in a paperback version. You don’t need to worry about page size, page margins, hyphenation, page numbers, footers or headers. All of these are irrelevant for E-book documents, because the smartphone or tablet device relies on dynamically resizing the pages it displays. Likewise, drop capitals and anything too fancy, distract from the on-screen experience. I mean, you can have them, of course you can, but if you are doing this by yourself, keep it simple.
First things first, you need to lose quite a lot of what would be in a paperback version. You don’t need to worry about page size, page margins, hyphenation, page numbers, footers or headers. All of these are irrelevant for E-book documents, because the smartphone or tablet device relies on dynamically resizing the pages it displays. Likewise, drop capitals and anything too fancy, distract from the on-screen experience. I mean, you can have them, of course you can, but if you are doing this by yourself, keep it simple.
Having removed all the things that hinder free-flowing text, you can put in all the extras that E-books enjoy. Links to your social media sites and websites. Links to email addresses, links to review sites for your book and most importantly, links to your other books. Hyperlinks that with a touch of a finger or the click of the mouse will take your readers to where you want them to be.
With all of that said, what are my top tips?
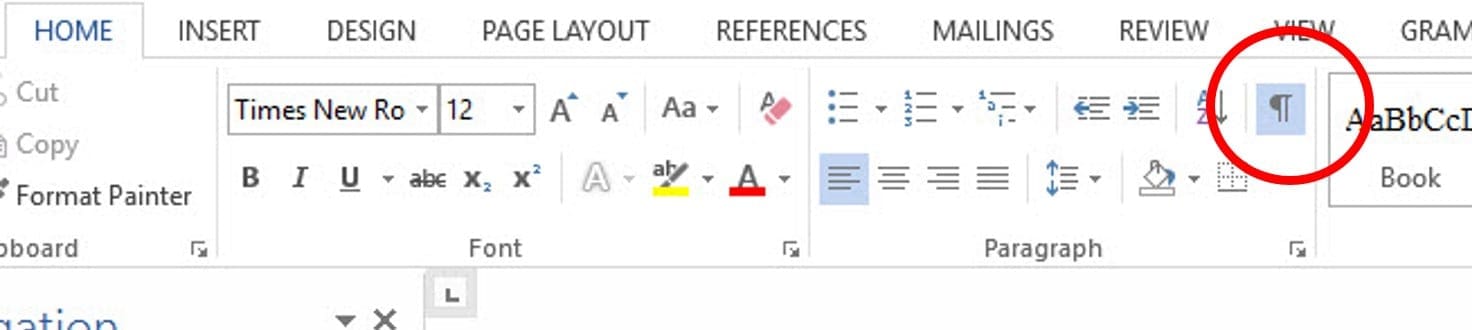
Learn to view your document correctly. You need to see the formatting marks, so turn them on. Yes, really! That little backwards facing P up on the ribbon, under the home tab in the paragraph group. It’s called the ‘Show/Hide’ command. Turn it on. You need to know where your paragraph marks are. Where the extra spaces are, where the tabs are and where the page breaks are – so use the thing that shows you them all. You also need to see the ruler and your navigation pane – so go to the ribbon, select the view tab and turn them both on in the show group.
Use the built in styles that word provides. Make your heading text how you want it to be and then update Word’s built-in headings to match your selection. That way you harness their power, whilst keeping your style. It will also allow them to appear in the navigation pane and the Table of Contents automatically.
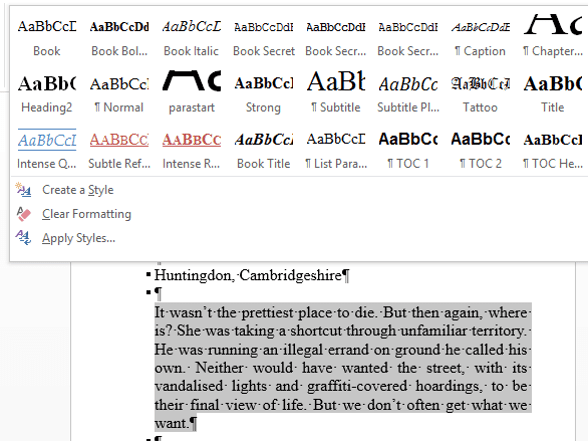 Create your own paragraph styles. Make your paragraphs look exactly the way you want them to appear, then create a style that captures that format. Do not use spaces or tabs to set an indent, use the ruler indent marks to move the first line if required. Then highlight the paragraph and go to the ribbon – home tab – styles group, select the dropdown and click on ‘Create a new style’. Give it a name. Use it to format all the rest of your document.
Insert hyperlinks to take your readers to where you want them to be. Copy the address of the page you want your readers to link to, then insert a hyperlink to that address. You can link to review sites, websites, social media, email or, most importantly, the sales pages of your other books.
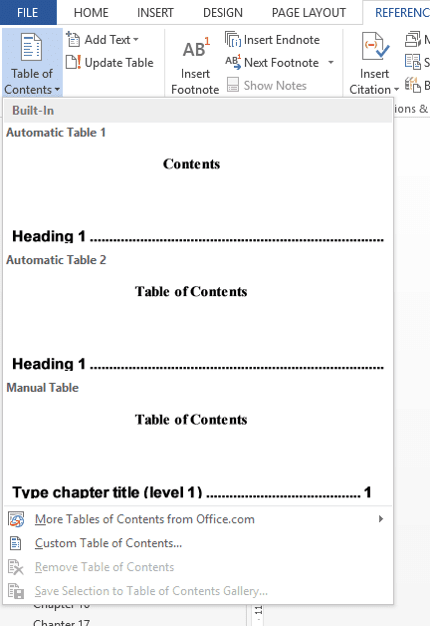
Insert a hyperlinked Table of Contents. If you have used the in-built Word headings then inserting a Table of Contents is a simple matter of clicking on the Reference Tab in word and choosing to insert a Table of Contents. Turn off page numbers, select hyperlinks, click OK and that is that!
If you are still floundering, then come join us for a one-day workshop that will teach skills like these and much, much more. The definitive, hands-on guide to Indie Publishing is a master class for writers looking to self-publish. Come and find out more here
